Embroidery Stitch Tutorial
Klik hier voor de Nederlandse tutorial.
Since the launch of the wonderful Pretty Little Things publication there have been lots of fun embroidery projects included for beginners! So, to help those learning, we’ve created this step-by-step tutorial explaining several of the most common embroidery stitches, in particular those which are featuring in Pretty Little Things issues.
For each of these stitches, you will need to secure your thread at the back of your work so it doesn’t undo. Do this by either tying a knot at the end of your thread right before starting to stitch, OR by weaving in the end(s) underneath other stitches at the back of your work. It will depend on the type of fabric you use; if the fabric is loosely woven or very delicate, a knot may not be suitable.
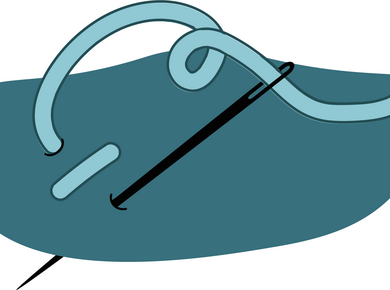
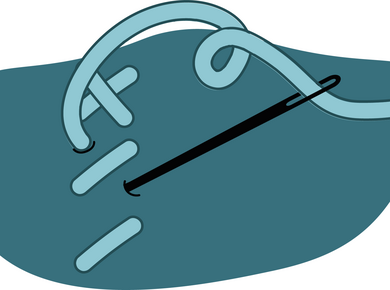
Running Stitch
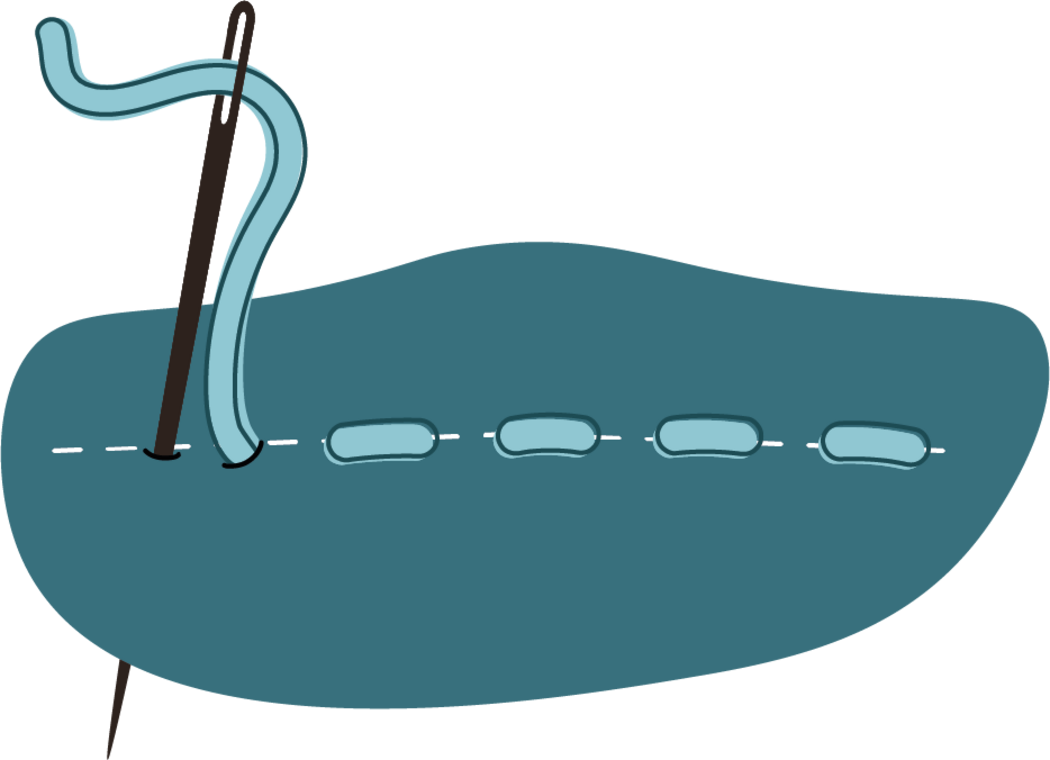
This everyday stitch is something you likely already know how to do, you just didn’t know what it was called till now!
Step 1 – Insert your needle from the back of your design, pull thread through leaving a tail
Step 2 – Insert needle back through front of fabric along the line you intend to embroider
Step 3 – Insert your needle from the back of your design again, keeping in mind to create consistent stitches and spaces between each stitch, and continue as such along your trace line
Whip Stitch
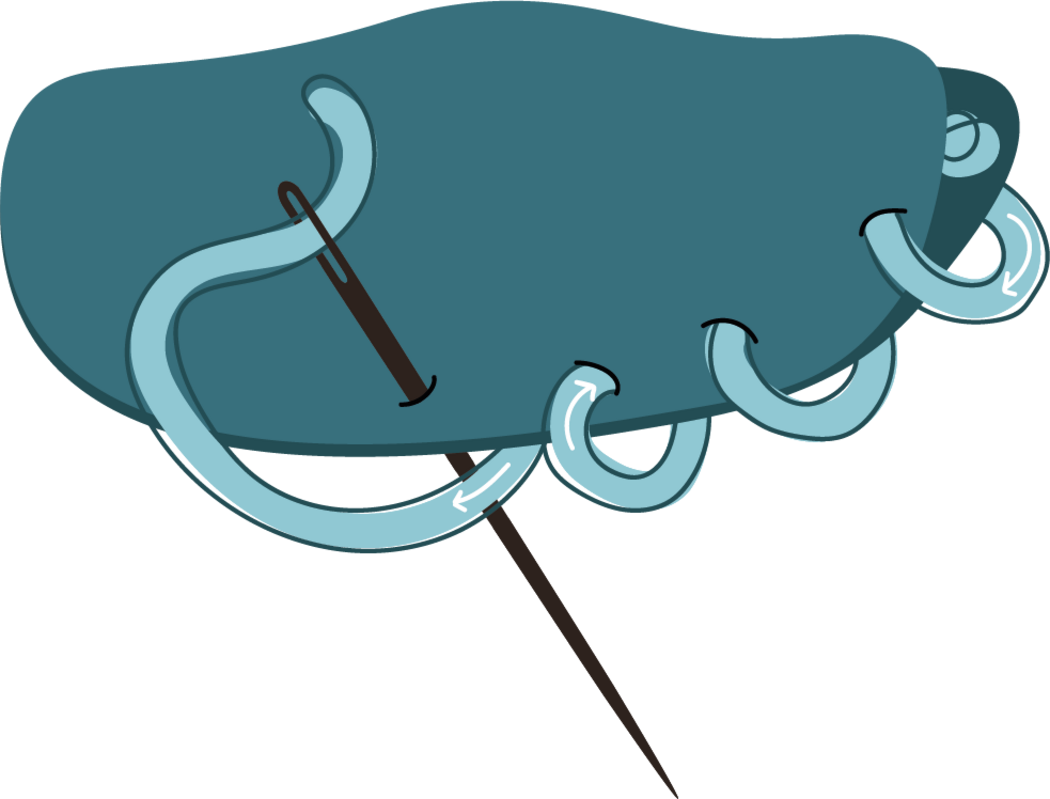
This is a popular stitch for closing seam openings!
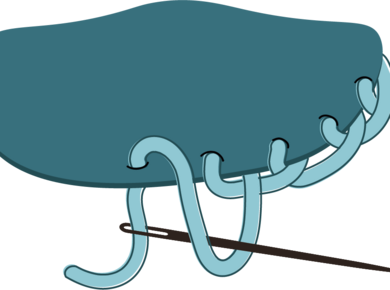
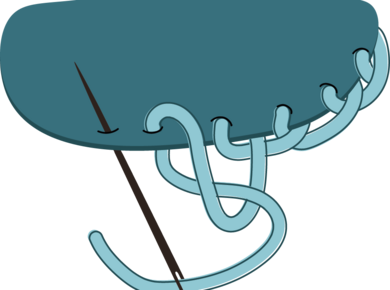
Step 1 – Hold or pin your seam closed, then insert your needle (with a knotted end) from the inside of the seam through the back side only
Step 2 – Bring your thread over the seam to the front side and insert needle through all fabric layers of seam
Step 3 – Continue along seam until closed
Backstitch
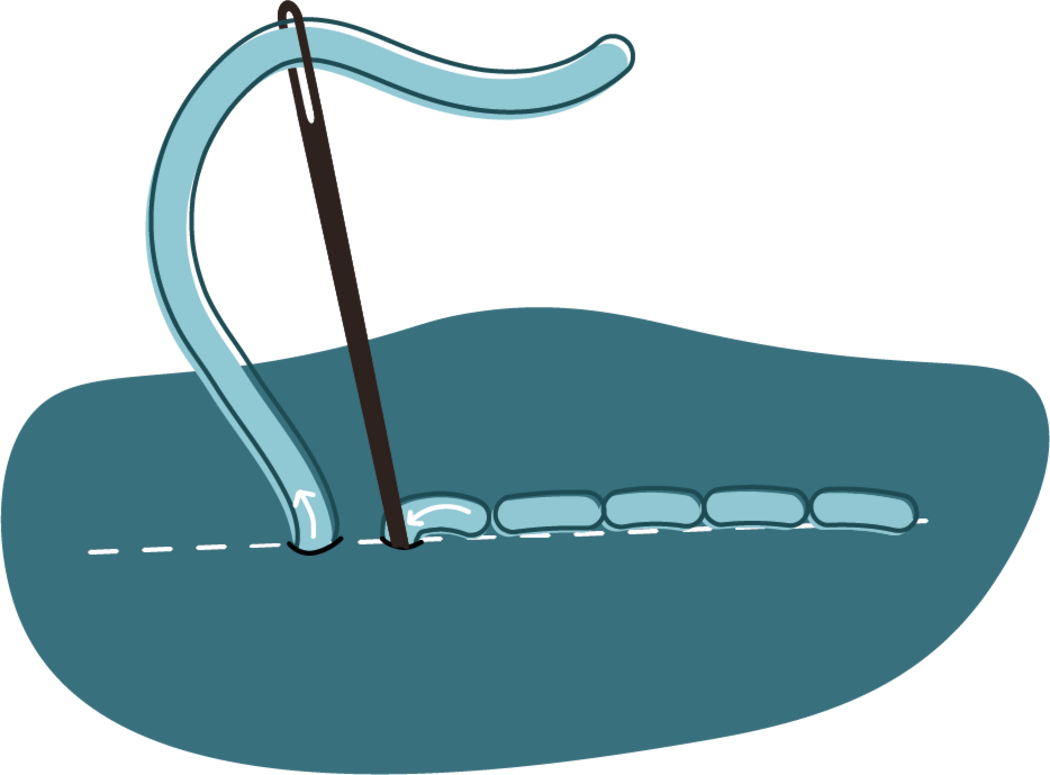
This is a great stitch for embroidering solid lines without any spaced between the stitches.
Step 1 – Create your first stitch: Working from your starting point and along your trace line, insert your needle from the back of your design, pull thread through leaving a tail, insert needle again further down
Step 2 – From the back of your design, insert needle through fabric at a distance equal to the length of your first stitch, further along trace line
Step 3 – Insert needle back through front of fabric at the point where your first stitch made ends
Step 4 – Repeat Steps 2-3
This classic stitch can be used to add details or entire designs in traditional cross stitch embroidery onto aida fabric, gingham fabric (chicken scratch embroidery), or on top of crochet stitches.
Step 1 – Insert needle through back of fabric at bottom left corner of one aida square (or equivalent)
Step 2 – Insert needle back through fabric at top right
Step 3 – Insert needle through back of fabric at top left
Step 4 – Insert needle back through fabric at bottom right
Note: When working multiple cross stitches in the same colour, work vertically (i.e. up then down in rows) by only completing the first part of each stitch ( / ) when working bottom up, followed by the second part of each stitch ( \ ) when working back downwards.
Double Cross Stitch
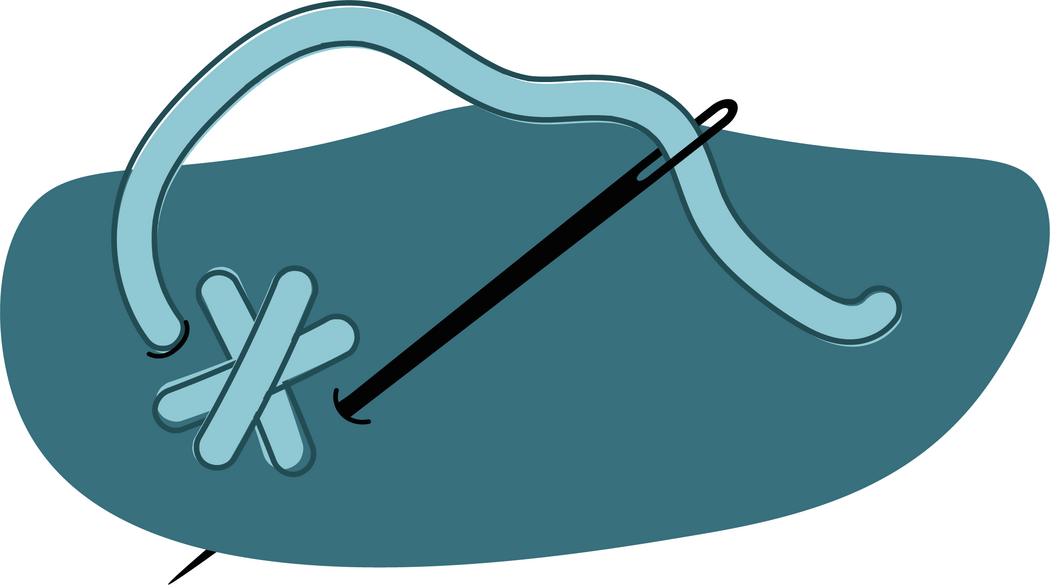
Double Cross Stitch
This variation on the classic Cross Stitch is perfect for creating little stars!
Step 1 – Insert needle through back of fabric at top left corner of one aida square (or equivalent)
Step 2 – Insert needle back through fabric at bottom right
Step 3 – Insert needle through back of fabric at bottom left
Step 4 – Insert needle back through fabric at top right
Step 5 – Insert needle through fabric at middle top
Step 6 – Insert needle back through fabric at middle bottom
Step 7 – Insert needle through fabric at middle left
Step 8 – insert needle back through fabric at middle right
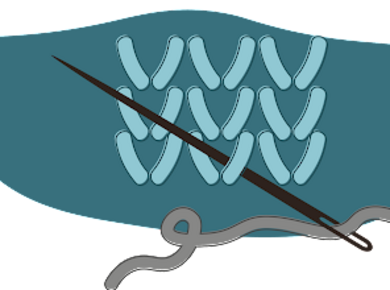
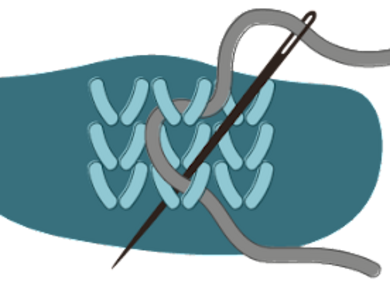
A super user-friendly stitch and a straight-forward alternative to knitted stranded colourwork, Duplicate Stitch allows you to add colour, text, or a design to your items knitted in Stocking Stitch!
Step 1 – Thread a darning needle with yarn that is in the same thickness as your project
Step 2 – From the back/‘wrong side’ of your project, insert the needle at the bottom of the ‘v’ where your stitch is to be placed
Step 3 – Next thread the needle beneath the stitch above
Step 4 – Then pass the needle back through the bottom of the stitch where you started, creating a ‘false stitch’ on top
Step 5 – Continue in this fashion working bottom up!
This lovely 3D-stitch is perfect for creating buds, the centre of flowers, spots, dots and more!
Step 1 – Insert your needle from the back of your design, pull thread through leaving a tail and wrap thread closest to fabric around needle three times
Step 2 – Insert your needle right beside your working thread (make a new hole) keeping tension on the thread
Step 3 – Pull needle and thread all the way through to make a French Knot
Satin Stitch
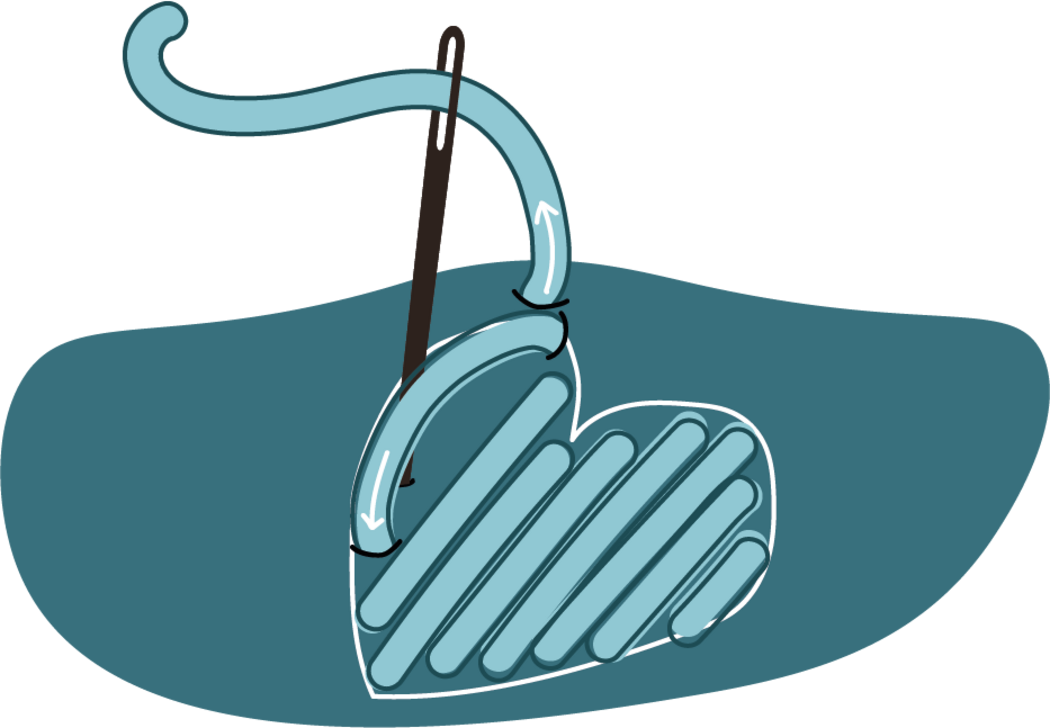
This stitch is used when filling in shapes, and it typically done using just 1 strand of embroidery thread!
Step 1 – After tracing your shape(s) onto fabric, choose a starting point on the trace line as close to one side of the shape as possible which will allow you to ‘colour in’ the full shape without returning to this point afterwards
Step 2 – Create your first stitch: Insert your needle from the back of your shape at your starting point, pull thread through leaving a tail, and moving downwards, insert needle again through front of fabric on trace line
Step 3 – Insert needle from the back of your shape right next to where you began your previous stitch
Step 4 – Moving upwards, insert needle again through front of fabric on trace line right next to where you ended your previous stitch
Step 5 – Repeat Steps 3-4
Weaving Stitch
There are many variations of ‘weaving’ stitches in hand embroidery. In essence, all variations require straight stitches that act as ‘anchors’ and thread is passed or ‘woven’ under (and over) them to create an underlying design. Below we offer explanations for two examples of this stitch.
Woven Wheel Stitch
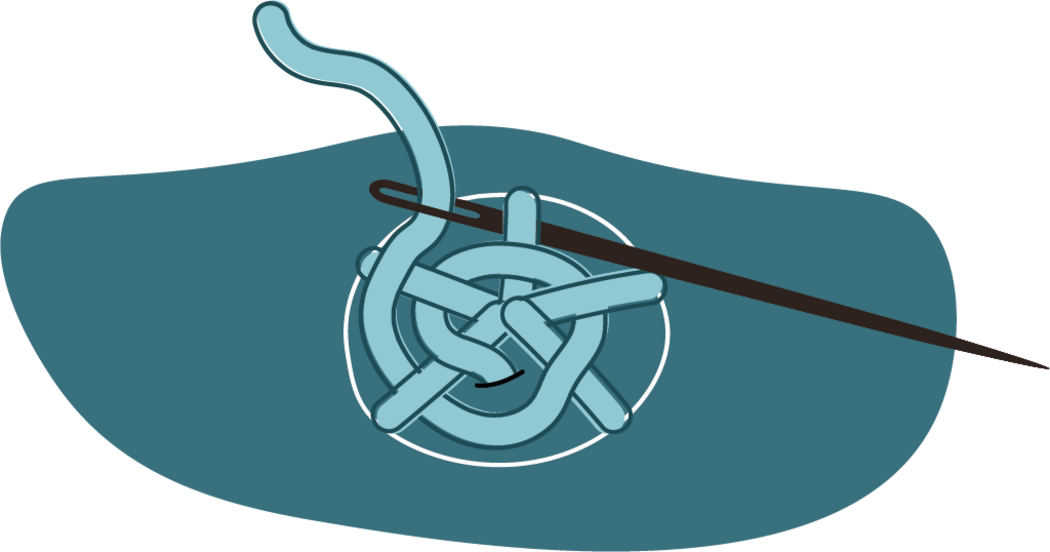
This fabulous stitch technique is typically used to embroider the most gorgeous, 3D roses.
Step 1 – After tracing a circle mimicking the size of your intended rose onto fabric, further draw 5 evenly spaced lines from the middle to the outer edge of the circle
Step 2 – Starting at the centre of the circle, insert needle from the back of your fabric and create 1 stitch over each of the 5 lines
Step 3 – Insert needle through back of fabric as close to centre of circle as possible, without passing through an existing stitch
Step 4 – Weave needle over and under the 5 stitches, moving clockwise around the circle until your rose in complete, keeping in mind not to pull the thread too tight when weaving as this can distort the shape of the rose
Step 5 – Insert needle back through fabric from front to back and fasten off
Woven Circle
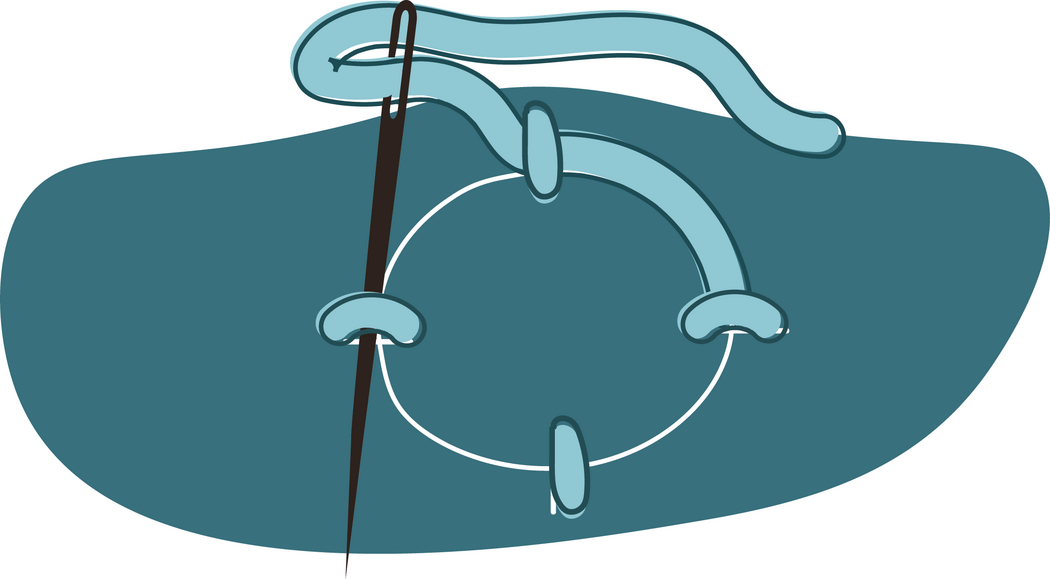
A simple stitch that incorporates weaving to create a curved edge!
Step 1 – After tracing circle onto fabric, draw four evenly spaced perpendicular lines starting from the outline and moving outwards (these lines represent stitches that ‘anchor’ thread passed underneath to make circle)
Step 2 – From the back of your design, insert needle through fabric and sew over each line with one stitch
Step 3 – Without breaking thread, insert needle through back of fabric at bottom of any stitch, pass needle under all four ‘anchor’ stitches around circle
Step 4 – Insert needle back through front of fabric at the same point where thread first came through
This stitch is a classic for creating edgings around patches, shapes, motifs, or for closing seams!
Edging around a shape:
Step 1 – If edging around a shape, insert needle from the back of the fabric to come through on the outline/edge of the shape
Step 2 – At a 45-degree angle from where your thread starts, insert your needle back through the fabric at a distance from the shape’s edge that mimics the stitch length you desire, do not pull tight
Step 3 – Bring your needle up and underneath the stitch you just made, pull thread to tighten to make first ‘blanket stitch’
Step 4 – Repeat Steps 2-3 till edging complete, fasten off at back of work
Closing a seam:
Step 1 – If closing a seam, insert your needle (with a knotted end) from the inside of the seam through the back side only
Step 2 – Bring your needle up and over to the front of your work and insert needle through all layers of seam, passing through where you first inserted needle
Step 3 – At a 45-degree angle from where your thread starts, insert your needle back through the fabric at a distance from the shape’s edge that mimics the stitch length you desire, do not pull tight
Step 4 – Bring your needle up and underneath the stitch you just made, pull thread to tighten to make first ‘blanket stitch’
Step 5 – Repeat Steps 3-4 till seam is sewn closed, fasten off at back of work
Split Stitch
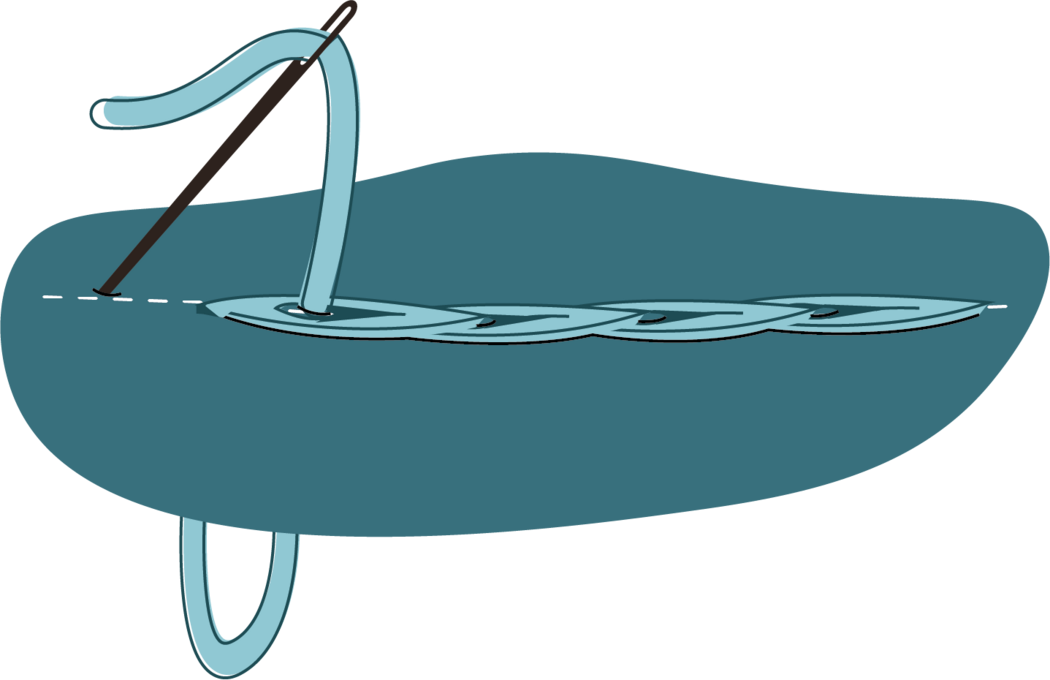
This simple stitch is great for outlines, offering an easy alternative to Back Stitch!
Step 1 - Create your first stitch: Working from your starting point and along your trace line, insert your needle from the back of your design, pull thread through leaving a tail, insert needle again further down
Step 2 - From the back of your design, insert needle halfway along first stitch in-between the thread fibres; this creates the ‘split’ effect
Step 3 - Continue along trace line
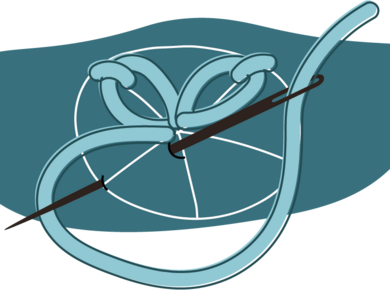
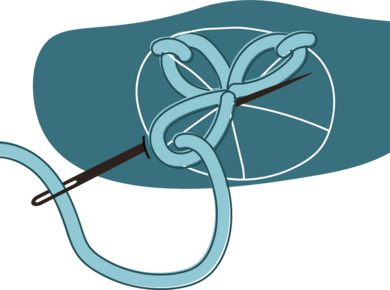
This is another wonderful stitch technique that results in creating beautiful embroidered daisies or leaves. I will describe the steps required to make a complete daisy below.
Step 1 – After tracing a circle mimicking the size of your intended daisy onto fabric, then draw 5 (or more depending how many petals you desire) evenly spaced lines from the middle to the outer edge of the circle (1 line = 1 petal)
Step 2 – Starting at the centre of the circle, insert needle from the back of your fabric, pull thread all the way through and then return your needle though the middle from the front to the back again leaving a generous loop
Step 3 – Insert needle from the back of your circle at the end point of 1 of the lines bring needle through loop and slowly tighten thread so a petal is made
Step 4 – Insert needle back through your fabric directly behind the thread at the top of the petal, this will secure the petal in place
Step 5 – Repeat Steps 2-4 for the remaining lines
Cretan Stitch
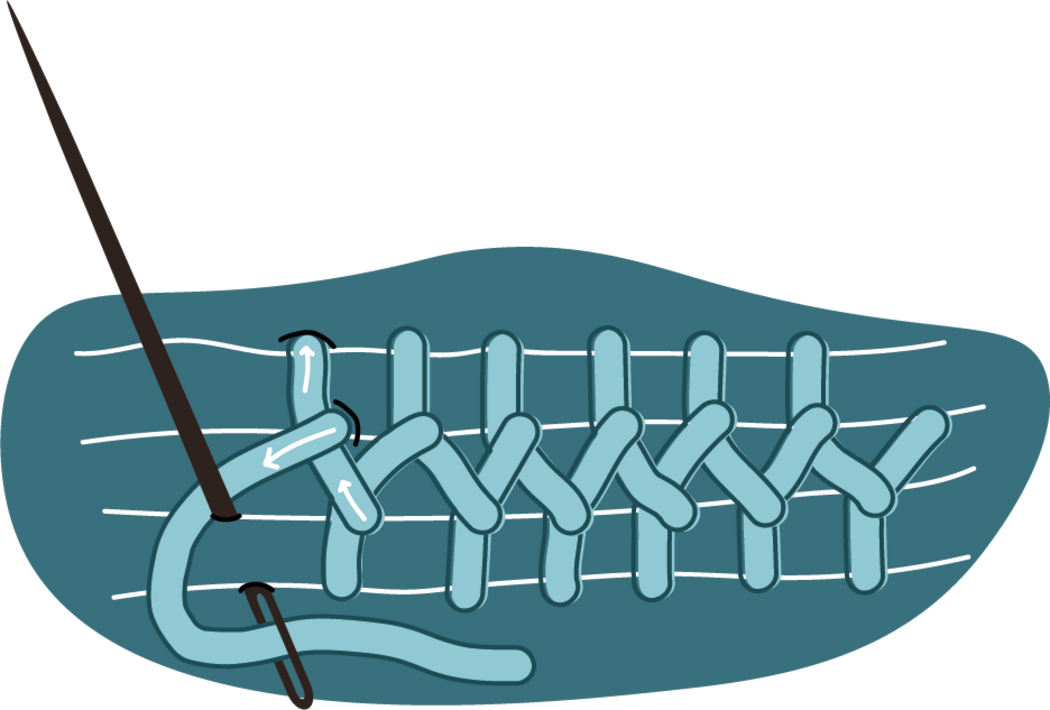
Step 1 – Draw four evenly spaced, parallel lines, running in the direction you intend to stitch, work from right to left
Step 2 – Insert needle from back to front at top of third line, then insert needle at top of first line, a little more left than first insert
Step 3 – Insert needle from back to front at top of second line, just right of thread running from third to first line
Step 4 – Insert needle from front to back on top of fourth line, a little more left then insert on first line
Step 5 – Insert needle from back to front on top of third line, underneath stitch just made and a little bit more left than stitch just made, then insert needle from front to back on top of first line
Continue Steps 3 to 5 to end
Slanted Cretan Stitch
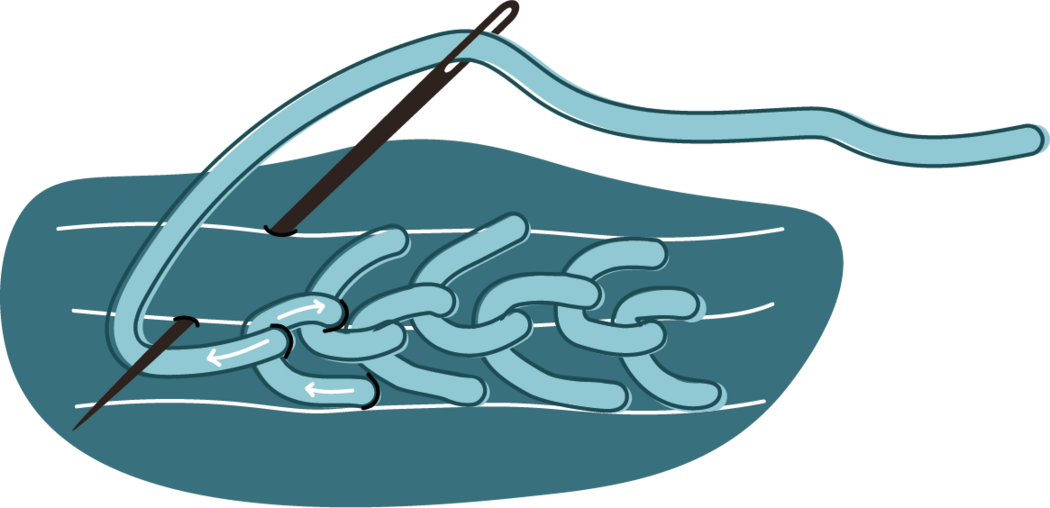
This stitch is worked in almost the same way as Cretan Stitch, but slanting the direction of the stitches according to the schematic above and using three instead of four lines.
Step 1 - Draw three evenly spaced, parallel lines, running in the direction you intend to stitch, work from right to left
Step 2 - Insert needle from back to front at top of second line, then insert needle at top of first line, exactly above first insert
Step 3 - Insert needle from back to front at top of second line and underneath stitch just made
Step 4 - Insert needle from front to back at top of third line, exactly underneath insert on second line, then insert needle from back to front at top of second line and underneath stitch just made
Step 5 - Insert needle from front to back on top of first line
Continue Steps 3 to 5 to end
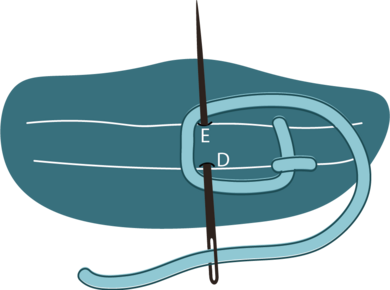
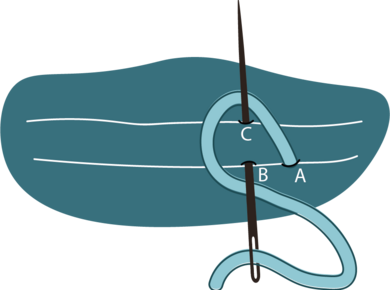
This stitch creates a similar effect to the blanket stitch, being also referred to as a ‘knotted blanket stitch’. Although both blanket stitch and buttonhole stitch are used for edging and joining seams, buttonhole stitch is a little more durable, used to prevent fraying where buttonholes are cut into fabric for closures on garments and accessories.
Step 1 – Insert needle from back to front at point A
Step 2 – Insert needle from front to back at point B and straight back to front at point C (before pulling thread), with working thread around needle as shown in illustration, pull tight downwards
Step 3 – Insert needle through front of fabric at point D (at a distance equal to distance between points A and B), catching working thread above needle in same way, then insert needle straight through to front at point E, bringing working thread beneath needle tip in same way, pull tight downwards
Repeat Step 3 to end
Double Seed Stitch
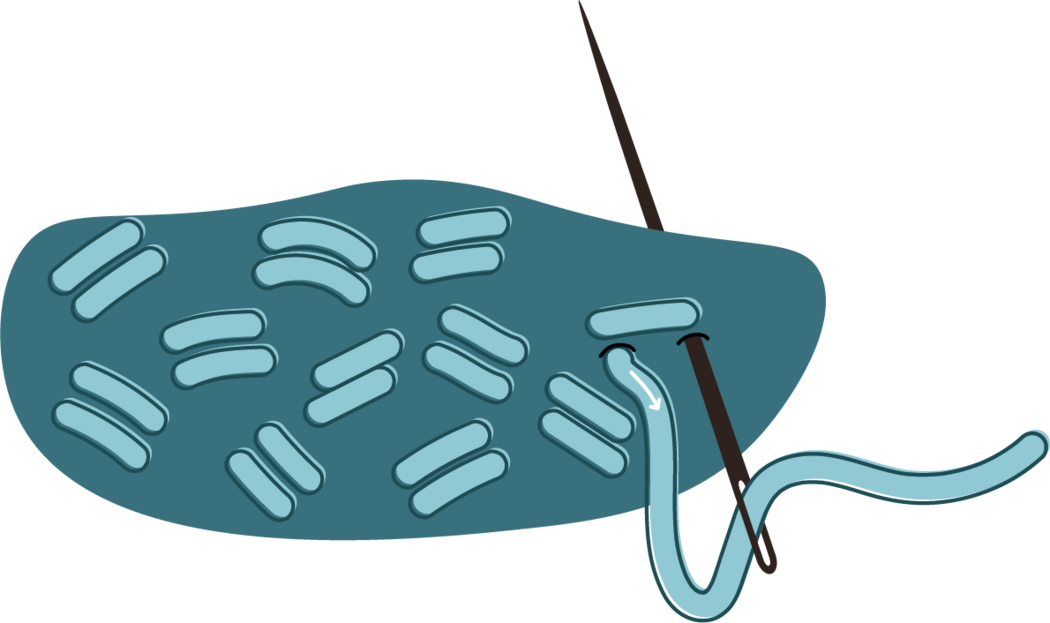
Also known as ‘isolated back stitch’, this simple stitch creates an attractive effect of little lines, used to fill in shapes or add texture in embroidery projects. Create this stitch by working two back stitches side by side onto fabric where desired, or follow the instructions below.
Step 1 – Trace the double seed stitches using a pencil or water-soluble pen onto your fabric (keep in mind that you want to cover the pencil marks if unable to remove them by washing), each double seed stitch will be marked with two lines
Step 2 – Insert needle from back to front on left-hand end of first line, then insert through front on right-hand end for first stitch of one double seed stitch
Step 3 – Work second stitch of one double seed stitch by repeating Step 2 for second line (first double seed stitch compete)
Repeat as needed for all double seed stitches
Seed Stitch
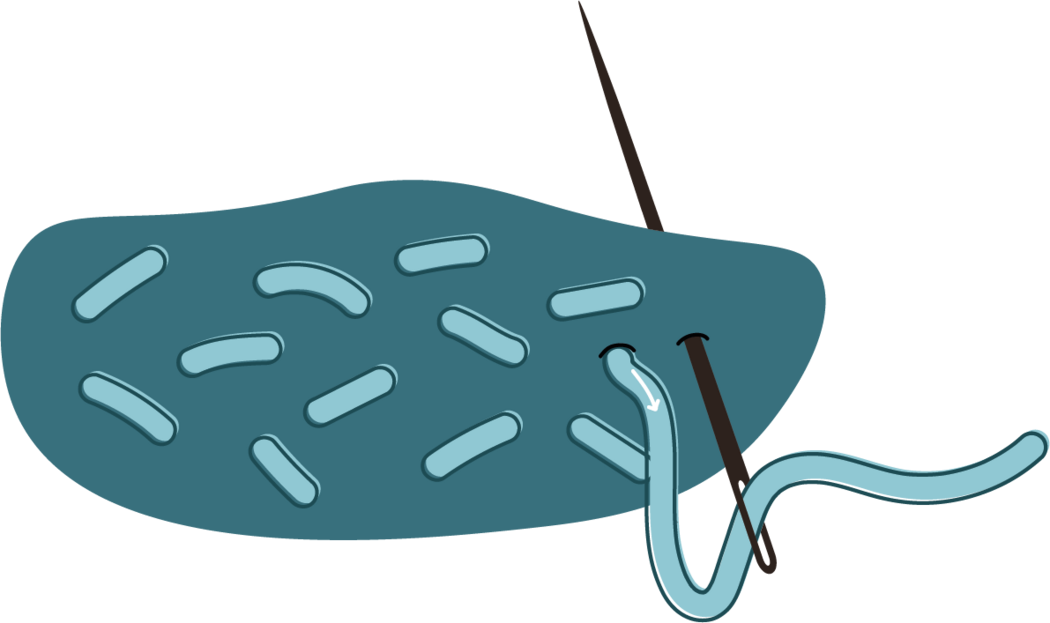
This simple stitch creates an attractive effect of little lines, used to fill in shapes or add texture in embroidery projects. Create this stitch by working one straight stitch onto fabric where desired, or follow the instructions below.
Step 1 – Trace all seed stitches using a pencil or water-soluble pen onto your fabric (keep in mind that you want to cover the pencil marks if unable to remove them by washing)
Step 2 – Insert needle from back to front at either end of line, then insert through front at other end to complete one seed stitch
Repeat Step 2 as needed for all seed stitches
Herringbone Stitch
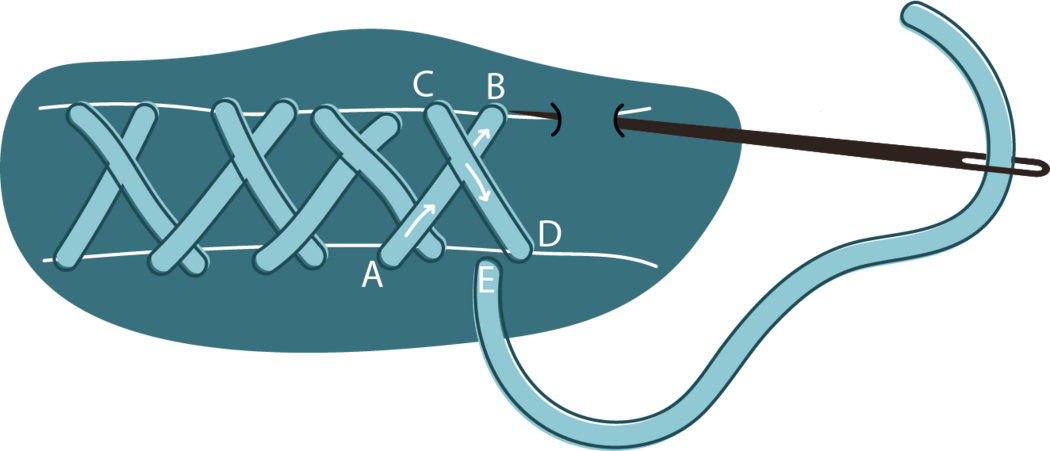
This embroidered stitch creates an effect that resembles the spine of a herring fish! It creates an attractive stitch pattern in projects.
Step 1 – Being by tracing lines of herringbone stitch pattern onto fabric, marking Points A-E as per schematic above
Step 2 – Insert needle from back to front at Point A, insert needle through front at Point B
Step 3 – Insert needle from back to front at Point C, insert needle through front at Point D
Step 4 – Insert needle from back to front at Point E, and continue pattern in same way as for Steps 2-3 to end
Chain Stitch
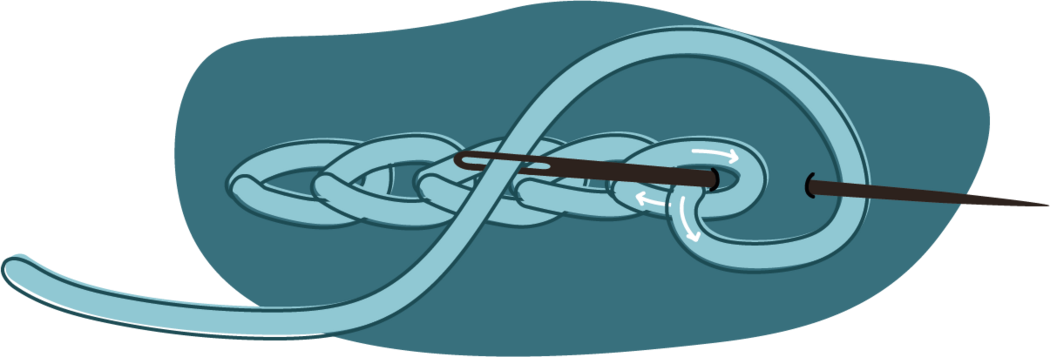
This embroidered stitch is used to create the appearance of a string of chains, worked by linking looped stitches together.
Step 1 – Along traced line, insert needle from back to front at either end of traced line, then insert back through same hole where thread comes through, do not pull tight
Step 2 – Insert needle through loop created by thread along traced line, at a distance equal to the desired length of each chain stitch, pull thread to form first chain stitch
Repeat Steps 1 and 2 to end
Detached Chain Stitch
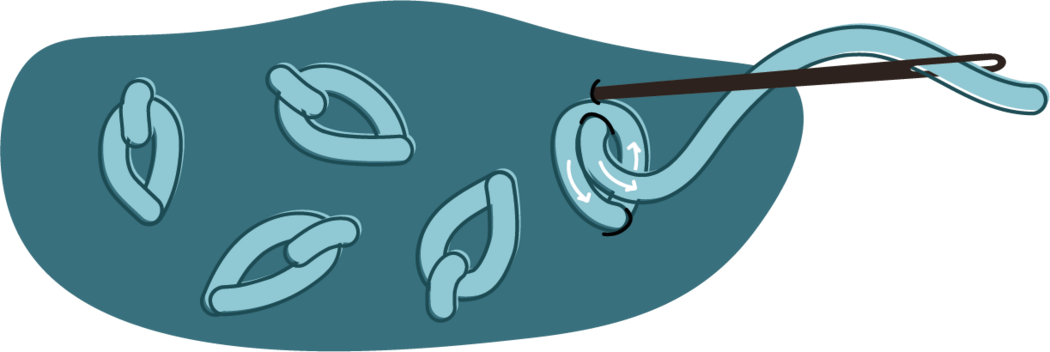
This stitch is based on the technique of chain stitches, but worked in isolation instead of interconnected to create embroidered details.
Stem Stitch
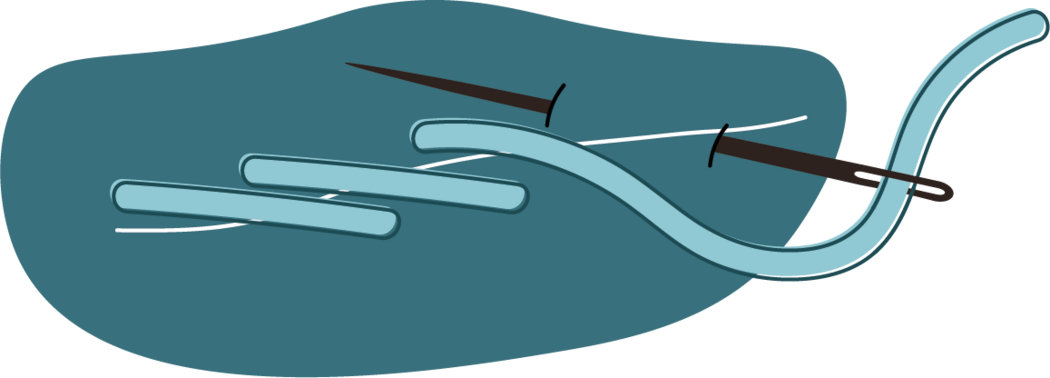
This stitch is often used for stems and for beautiful flowing lines.
Step 1 - After tracing the line to stitch, insert the needle from the back of the fabric at the start of the line, pull through, insert from front to back further along line then back to front halfway between.
Step 2 - Pull thread through and pull to tighten, then insert the needle again from front to back further along line, keeping the same length as the first stitch and again from back to front halfway between.
Step 3 - Repeat Step 2 until the end of the traced line.
